How to create a simple RSS Bot for Discord
Ach ja, somehow all the Discord Bot tutorials I came across kinda suck, mostly in terms of glancing over specific information or simply due to being out of date, so here is for me hopefully doing a bit better with a very simple example.
This tutorial is split into two parts: The first will be on how to create the the Discord Bot User, the configuration and how to finally invite it to a server. The second part will be on the actual code and how to use this Bot to send messages into a channel based on RSS feeds.
How to set up a Discord Bot
To create a Discord Bot, you have to go to the Discord Developer Portal and create a new application. Name it however you want and fill out the general information if you so desire.
Under the Bot settings, enable “Presence Intent”, “Server Members Intent” and “Message Content Intent” under Privileged Gateway Intents. Without those, the Bot won’t be able to send messages into a channel.
Lastly, under OAuth2, you can create the invite link for the Bot. Under Scopes, select “bot” and enable all the things your Bot should be able to do. For the scope of this tutorial, “Send Message” is the only permission the Bot needs. The generated URL at the bottom can simply be pasted into a new browser tab and you can select to what server the Bot should be invited to.
How to write an RSS script
For this part, I will mostly go over my own RSS Bot. The code can be found on Github. Yes, it is written in Python and no, I will not take criticism. If you want to use another language, you are free to do so. Here is a list of Discord libraries and their associated languages.
The general idea of the program is that on startup, the Bot connects to a local database (I will explain why later), as well as to a channel in your server and it will then periodically look for new articles in the RSS feeds and post a message if one is found.
The code consists mostly of only two files, but depending on your style, these can be further modularized: main.py takes care of the actual functionality, while config.py is, as the name implies, responsible for settings and anything that isn’t hardcoded into the code itself.
For this project, you will need two additional dependencies: The discord library, as well as an RSS library of your choosing, like feedparser for example. Simply install them both using pip:
pip install discord.py feedparser
config.py
Finally, it is time to start coding. In the config.py, we will create the following variables:
# Bot Token
TOKEN = "YOUR_BOT_TOKEN"

# Channel ID
CHANNEL_ID = 123456789123456789

# Update interval for how often the bot is supposed to check if a new entry in the RSS feed exists (in Minutes)
UPDATE_INTERVAL = 5

# How far a new entry in the RSS feed can can be published in the past before being ignored (in Days)
LAST_ARTICLE_RANGE = 5

# Add the RSS feeds here. Each object consists of the RSS feed URL and an optional Discord User-ID, whose user will be tagged in the message
RSS_FEEDS = [
    {
        "url": "LINK_TO_RSS_FEED",
        "user": "USER_ID"
    },
    {
        "url": "LINK_TO_RSS_FEED",
        "user": "USER_ID"
    }
]
TOKEN is your Bot Token. If you have only just created the Bot User, it doesn’t exist yet and has to be generated first. In your Discord Application, under Bot, you can reset the Token. Copy and save it somewhere, as it won’t be displayed again. Also, do not give your Token to anyone you do not trust, as the Token grants you full access to the Bot.
CHANNEL_ID is the channel ID of the channel you want the Bot to write messages to. If you do not know the channel ID, go to your Discord User Settings and under “Advanced Settings” you can enable “Developer Mode”. This allows you to copy the ID when you right-click on a channel or other users.
UPDATE_INTERVAL and LAST_ARTICLE_RANGE are the first real settings. The update interval simply states how often the Bot should look for new entries in the RSS feeds and the last article range limits to how far in the past a new article can be published before the Bot ignores it and won’t write a message in the channel.
Lastly, RSS_FEEDS is a list of the RSS feeds. Each entry is an object, consisting of a url for the RSS feed, usually ending on an .xml extension, and a user ID. The user argument is optional and will tag a certain user in the message sent to Discord.
main.py
In main.py, import everything you need. This includes the Discord and RSS library, as well as the config file, but also something to make dealing with time a bit more manageable and a light-weight database.
import feedparser
from datetime import datetime, timedelta, timezone
import sqlite3
import discord
from discord.ext import commands, tasks

from config import TOKEN, CHANNEL_ID, UPDATE_INTERVAL, LAST_ARTICLE_RANGE, RSS_FEEDS
The reason why we create a database is simple: We want to know whether the Bot has already send a message for a specific article, as to prevent duplicates. We could also technically go through the entire channel history to see if an article was already sent, but not only would we need to give the Bot additional permissions, it would also be more complicated with no real benefit, so database it is.
We initialize the database, if it is the first time starting the bot, and connect to it. This will create the table articles, which stores the title and link for each article.
connection = sqlite3.connect('articles.db')
c = connection.cursor()
c.execute('''CREATE TABLE IF NOT EXISTS articles (title TEXT, link TEXT)''')
connection.commit()
Next, it is time to actually define the Bot and start the whole thing up. While the Bot doesn’t actually need a command prefix, as it won’t listen to any, future-proofing is always nice. On the other hand, the Bot won’t run without the proper intents. discord.Intents(messages=True) should probably suffice for this example, but again, who knows what one might add on top of this.
bot = commands.Bot(command_prefix='!', intents=discord.Intents.all())

if __name__ == "__main__":
	bot.run(TOKEN)
With this, the Bot is technically running and you should be able to see the green circle on the profile picture indicating that it is online. However, it would probably be a good idea to verify whether the Bot started correctly. For this case, there exist events, which trigger on… well, certain events. So, we add the on_ready() event, print a message to the console and run the function that handles all the logic.
@bot.event
async def on_ready():
	print(f'{bot.user} has connected to Discord!')
	post_new_articles.start()
Specifically, post_new_articles isn’t just a normal function, but a task, hence the additional .start method. Since we want the Bot to look for new entries in a feed periodically, we can simply create a task, which will continuously be executed at a certain interval, which can be set from seconds to hours.
The logic of the function isn’t that complicated: The Bot connects to the channel and fetches the new articles if they exist. Then, for every new article, it creates a message, sends it to the channel and records the new article in the database.
async def post_new_articles():
	channel = bot.get_channel(CHANNEL_ID)

	new_articles = get_new_articles()
	for article in new_articles:
		message = format_to_message(article)
		await channel.send(message)
		record_article_in_db(article["article"])
Fetching the new articles also isn’t that hard either. You simply loop through all the entries of all the RSS feeds, check if an article, in this case the article link specifically, is already stored in the database and whether the publication date isn’t too far in the past. It might look like a lot at first, but this is mostly due to how the data is nested.
The returned value isn’t just the article though, but the whole article object, the user ID stored in the config and the name of the RSS feed, since we need all these values for the message.
def get_new_articles():
	new_articles = []

	for rss_feed in RSS_FEEDS:
		entries = feedparser.parse(rss_feed["url"]).entries
		for entry in entries:
			if not article_in_db(entry):
				pub_date = datetime.strptime(entry.published, "%a, %d %b %Y %H:%M:%S %z").replace(tzinfo=timezone.utc)
				if datetime.now(timezone.utc) - pub_date <= timedelta(days=LAST_ARTICLE_RANGE):
					new_articles.append({"article": entry, "user": rss_feed["user"], "feedTitle": feedparser.parse(rss_feed["url"]).feed.title})

	return new_articles

def article_in_db(entry):
	c.execute("SELECT link FROM articles WHERE link=?", (entry.link,))
	if c.fetchone() is None:
		return False
	else:
		return True
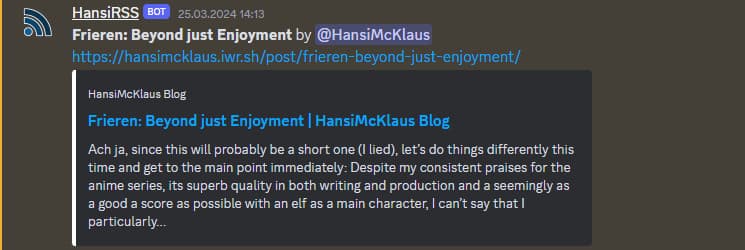
The format_to_message function is mostly string concatenation. You first extract the article title, user or feed title and the article link and just concatenate them together to form the message according to the template [ARTICLE TITLE] by [@USER / FEED TITLE]\n[ARTICLE LINK].
def format_to_message(article):
	article_title = article["article"].title
	article_user = article["user"]
	article_feed_title = article["feedTitle"]
	article_link = article["article"].link

	message = f"**{article_title}** by "
	if article_user:
		message += f"<@{article_user}>"
	else:
		message += f"{article_feed_title}"
	message += f"\n{article_link}"

	return message
When the message is send by the Bot, Discord will render it like this. Of course, you are free to change the template to your liking.
Lastly, we record the article in the database, so the Bot won’t write the same message again. We do this after the message has been sent in case something goes wrong with sending the message, since it wouldn’t be able to post the article again, once the error is resolved, if it article were already in the database.
At the end, it is just a simple insert of the article title and link into the database.
def record_article_in_db(article):
	c.execute("INSERT INTO articles (title, link) VALUES (?, ?)", (article.title, article.link))
	connection.commit()
And that’s about it. If you were to fill out the config and start the script, you should have a functioning RSS Bot running. Obviously, you should run it on a separate server for constant uptime. The only thing left would be to expand upon it. I initially thought about adding commands to the bot, but figured a simple config would be a more elegant solution. Well, considering I just wanted to write a simple RSS Bot, this shall suffice. I hope this was helpful.
Related Posts

Comments


Recent Posts
5188 Words | July 4, 2026
2386 Words | June 8, 2026
2082 Words | May 13, 2026
5357 Words | April 5, 2026
2583 Words | February 8, 2026