How to create a song for UltraStar Deluxe (Updated)

EDIT: This post is now available in German.
Ach ja, around two years ago, I wrote a tutorial on this subject already. The old one is neither wrong nor bad, but in the meantime, I learned some more things and can also probably explain everything a bit better now. So, here we go again.
UltraStar Deluxe (USDX) is a free karaoke application, which uses user-generated songs. While creating a new song is not particularly difficult, if slightly time-consuming, information on how to do so is few and far between, to the point my first tutorial is actually one of the first results on Google. So here is a guide for newcomers on how to create a song for UltraStar Deluxe (or any software that uses the same format).
Step 0: Programs and Ressources
While technically everything can be done in UltraStar Deluxe itself, I wouldn’t really call it user-friendly and considering better alternatives exist, there is no real reason to use the default editor.
To get started, I recommend UltraStar Creator. This will create the initial karaoke file, including the meta data. It also let’s you split the lyrics into individual syllables and makes you roughly time them, so you end up with a good basis.
Yass allows you to refine everything, from the timing of the syllables to the line breaks, you can set lines as golden or freestyle and it is also a good tool to pitch everything. Yass Reloaded is a fork of Yass with some additional features.
Another Editor is Karedi. I haven’t used it much yet, but it is basically Yass with a modern user interface. It might need some time getting used to, if you have only ever edited in Yass, but it’s probably worth it in the long run.
Then there is UltraSinger. This is an AI-tool that, in the best case, will do everything for you, from the meta data, to transcription, timing and pitching, to the point you will only need to fix a few errors. However, in my experience, beyond some questionable decisions for gathering song data, the results may vary a lot depending on the type of song, to the point it was always easier for me to create the song from scratch. It is a bit of a hassle to get working, but might save you a lot of time, especially with the program (hopefully) getting better in the future.
It might be worth taking a look at the UltraStar Format Specification to see what most of the stuff in the karaoke file actually means. I will explain everything you need, but it can’t hurt to have a comprehensive list of every tag there is. Depending on how much progress is made in this regard, there are currently plans to unify the specification, as well as update some of the tags, so you should also look out for the Official Format Specification.
If you are looking for other songs, both USDB and UltraStar España have a large library of user-generated songs (You need an account for both). I can also recommend the USDB Syncer, which allows you to not only download the karaoke file, but also the associated audio and video files with just a few clicks. Lastly, you can also join the UltraStar Discord Server.
Step 1: Setting up a new Song
Navigate to the directory where all your other songs are located. By default, this is the songs directory in the UltraStar Deluxe program files. On Windows, you can find the folder under Program Files (x86)\UltraStar Deluxe\songs, and ~/.ultrastardx/songs if you are running Linux. You can also add a custom song directory by editing the config.ini under “Directories”.
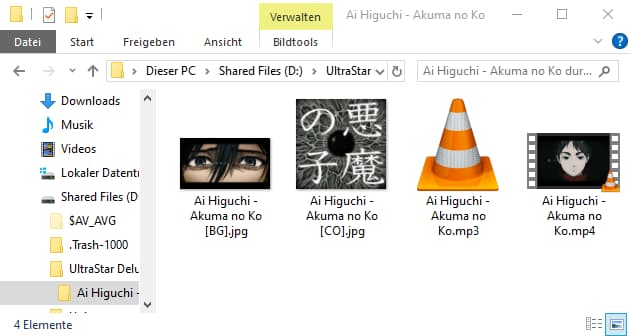
In the song directory, create a new folder with the name [Artist] - [Song Title]. While you can technically name every file however you want, it is convention to name them according to the artist and song title. In this folder, you will have to place at least the audio file. UltraStar Deluxe accepts several audio formats, but the most common ones should be .mp3 and .m4a. Additionally, you can add a cover image, a background image and a video. Again, these can be named however you want, but it is convention to name them [Artist] - [Song Title] [CO] for the cover, [Artist] - [Song Title] [BG] for the background and [Artist] - [Song Title] for the video.
For this tutorial, I will create “Akuma no Ko” by Ai Higuchi from the anime series Attack on Titan. At the end, your folder should look something like this.
Step 2: Creating the Karaoke File in UltraStar Creator
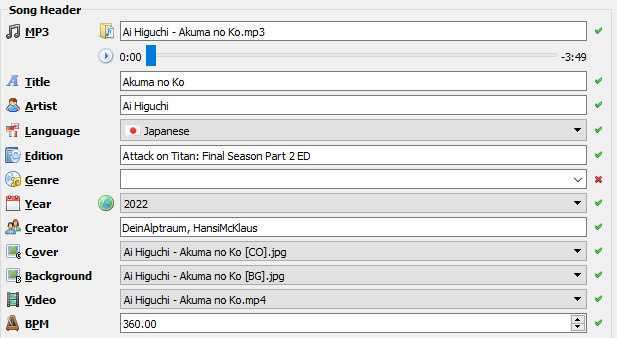
First, in UltraStar Creator, you have to select the song you want to create the file for. You can simply drag and drop the audio file into UltraStar Creator and it should fill out some of the meta data already.
With the exception of the BPM field, all of the meta data should be self-explanatory. The only mandatory fields are Title, Artist and BPM, while everything else is technically optional. If you give both a video and a background image, the video takes precedence, while the image will be used as a backup in-game. Also, while Edition is supposed to be used for whether a song is used in commercial games like SingStar or Let’s Sing, I abuse this field to simply provide information if the song is used in other media. Again, with potential changes to the format specification coming in the future, we might get a dedicated Tags field for such information.
Now, I have mentioned that the BPM isn’t so clear cut. While the name implies, that this is simply the BPM of the song, it is actually the resolution for the notes we are about to create, with every beat being divided into four smaller ticks. You could theoretically set the BPM to any arbitrary number, but you should actually set it to a multiple of the actual BPM of the song, in most cases two or four times the BPM, as this will yield more accurate and consistent timing. Ultrastar Creator will try to guess the BPM based on the audio file and, in most cases, you can probably round it to the next even number. However, since you can simply look up the BPM of most songs, I would recommend a quick google search over trusting the program.
For example, Ultrastar Creator guessed the BPM of “Akuma no Ko” on 367.17, while the actual BPM is 90, or 360 when multiplied by four. Values between 200 and 400 tend to work well. You also shouldn’t exceed a BPM of 500 or use non-integer values.
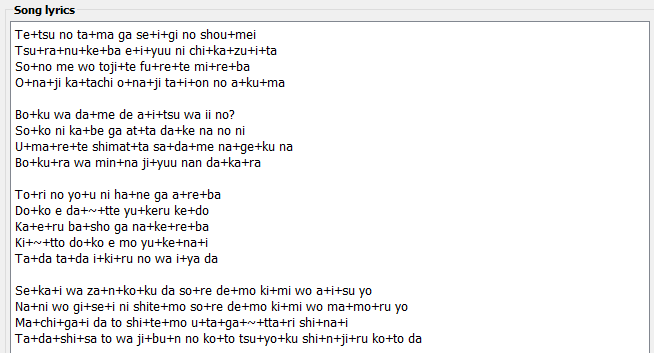
Next, paste the lyrics of the song into the large text field and make sure there aren’t any hidden special characters, like weird line breaks or invisible spaces, as these are often recognized as their own characters and will mess up the tapping process. Also think about what lyrics are to be included. Background vocals, etc. can be set as freestyle later, but if you don’t want to bother with, for example, a rap sequence, just leave them out.
UltraStar Creator differentiates between words and syllables. A word is separated by a whitespace, while syllables are separated by a +. So when splitting the lyrics into syllables, you will have to put a + between the syllables inside a word, while words themselves should already be separated by a whitespace. A line break will translate into a page break in UltraStar Deluxe. If a word only consists of a single syllable, you don’t have to add an additional +. At the end, everything will be split into syllables, but the whitespace after a word will be appended before the first syllable of the next word in the finished karaoke file, but more on that later.
Also, if you have a repeated note of the same syllable, for example in the middle or at the end of a word, you should depict every note by an additional ~. So, for example, if you have a long repeated a sound at the end of a word, which is sung in different pitches, instead of writing …+a+a+a+a+a, it is …+a+~+~+~+~.
There isn’t a particular logic to be applied here and this process differs wildly from language to language, so you will simply have to listen to how the song is sung. I tend to listen to the song on either 0.75 or 0.5 speed, since this makes it significantly easier to listen for the syllables. Also pay attention to whether multiple syllables are sung “together”, as to not accidentally split them incorrectly.
Once the lyrics are prepared, you can finally time them. Adjust the playback speed in the top left corner to your liking and press on the play button in the bottom left box. While the song plays, simply press the space bar every time you hear a new syllable. The current and next syllables are always displayed at the bottom of the screen. You can also hold the space bar for longer notes, but it is easier to readjust them later, so just focus on the timing for now. Since we later fix everything anyway, don’t spend too much time trying to be perfectly accurate. The only syllable you should time accurately is the very first one, since this one also determines the Gap field, but this can also be adjusted later.
Once every syllable has been timed, you can save the results, which will create the karaoke file. If you open the file with a text editor, you can see the meta data, as well as the instructions for UltraStar Deluxe.
#TITLE:Akuma no Ko
#ARTIST:Ai Higuchi
#LANGUAGE:Japanese (romanized)
#EDITION:Attack on Titan: Final Season Part 2 ED
#YEAR:2022
#CREATOR:DeinAlptraum, HansiMcKlaus
#MP3:Ai Higuchi - Akuma no Ko.mp3
#COVER:Ai Higuchi - Akuma no Ko [CO].jpg
#BACKGROUND:Ai Higuchi - Akuma no Ko [BG].jpg
#VIDEO:Ai Higuchi - Akuma no Ko.mp4
#BPM:360
#GAP:5840
#START:5
#END:219000
As you can see, the header is basically just the meta data we input into UltraStar Creator. #GAP was inserted by UltraStar Creator and indicates the time between the start of the song and the very first note in milliseconds. I also added #START and #END to the header, since my version of the song starts with five seconds of nothing and I want it to end at 3:39 (219 seconds). #START is measured in seconds, while #END is in milliseconds. Don’t ask me why, programmers don’t know what consistency even means. Lastly, I edited the language to be Japanese (romanized) instead of just Japanese, since the lyrics aren’t actually in Japanese script.
The rest of the file consists of the actual karaoke data. Each line consists of one syllable and is formatted as [Type] [Start] [Duration] [Pitch] [Lyrics]:
Typeis the line type and can be set to Normal (:), Golden (*), Rap-Golden (G), Rap (R) or Freestyle (F)Startdenotes the tick the note starts. Remember that the notes start relative to the#GAPDurationis the length of the notes in ticks. Each beat is divided into four ticksPitchis the pitch of the note. By default, it starts with C4 at 0 and increases/decreases for every half-tone, meaning the notes are transposed by one octave when increased/decreased by 12. While USDX doesn’t differentiate in what octave is sung, the pitches will still be displayed accordingly, i.e. a C5 (12) will be displayed above a C4 (0)Lyricsis the content of a specific note and in most cases the respective word/syllable
Currently, nothing is timed or pitched, which is why the length and pitch are all the same. We will change that shortly. If a line starts with -, it indicates a line break instead of a syllable. Also, the file has to end on an E, so if you are editing the file itself, don’t accidentally delete the last line.
: 0 1 0 Te
: 2 1 0 tsu
: 6 1 0  no
: 10 1 0  ta
: 14 1 0 ma
: 22 1 0  ga
: 31 1 0  se
: 35 1 0 i
: 39 1 0 gi
: 43 1 0  no
: 47 1 0  shou
: 53 1 0 mei
- 60
: 61 1 0 Tsu
: 67 1 0 ra
: 71 1 0 nu
: 75 1 0 ke
: 79 1 0 ba
: 87 1 0  e
: 91 1 0 i
: 95 1 0 yuu

...

E
Step 3: Fixing everything in Yass
When starting Yass for the first time, it will prompt you to set a path for the song library. Simply enter the directory where all your songs are located. All your songs should be listed now. When adding a new song to the directory, Yass needs to be refreshed (Icon right to the number of songs). Search for the new song and click on the edit button (Note and pencil) at the top to start editing. If you open up Yass again, you can edit the last song directly by using the shortcut Ctrl + R.
There are a few other shortcuts, that will make editing in Yass easier:
Space: Plays back selected notesLeft/Right: Swap between notes in current lineUp/Down: Swap between linesDel: Remove current note and merge syllable it into the next noteCtrl + Del: Remove selected notesCtrl + Left/Right: Select beginning of note and change its starting positionCtrl + Up/Down: Select note and change its pitchAlt + Left/Right: Select end of note and change its durationShift + Left/Right: Select entire note and shift the starting position without adjusting the durationEnter: Split the current line at the selected note into two and add a new page break inbetweenCtrl + W: Toggle TicksCtrl + U: Toggle AudioCtrl + B: Toggle InstrumentCtrl + I: Toggle between playback speeds (100%, 50%, 33%, 25%)
You can also select several syllables and even multiple lines by selecting them in the text area in the top right. To edit the lyrics, simply right-click into the text area and ignore the spell correction. Additionally, you can split a syllable by clicking at the top of the syllable blocks. This will create another note with a ~. Before we can correct the general timing, we have to fix one potential error: The Gap.
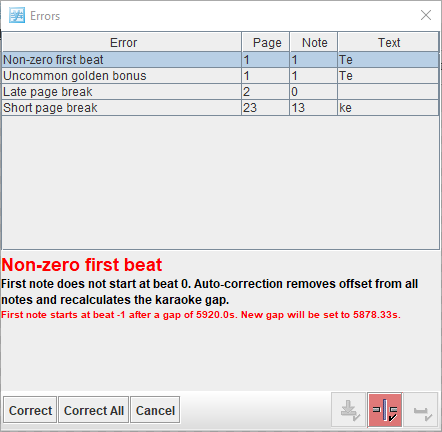
For everything to line up nicely, the Gap should be set as accurately as possible. Change the starting position of the first block until it lines up perfectly with the audio. Then go into the errors (red box at the top), select “Non-zero first beat” and click correct at the bottom. This will set the correct offset (#GAP). Skip this part, if your first syllable is already timed correctly. If you know the gap already, for example by looking at the waveform, you can also change the Gap manually by editing the #GAP field in the karaoke file. You can ignore all the other errors for now.
The timeline is split up into beats, which themselves are split into four smaller segments, which I call ticks. In most cases, a syllable is a multiple of two or four ticks long. In each line, edit the starting position and duration of each syllable, until it fits the song. The timing you did in the UltraStar Creator should give you a good foundation from which to edit them. In my experience, it is easier to time them by reducing the playback speed to 50%. Since most songs have repeating parts, one can often copy (Ctrl + C) the melody of entire segments to later parts. Regularly play back the melody without the audio (Ctrl + U) to see, if it sounds right from the ticks alone and adjust if necessary.
If you have some freestyle lyrics, like prominent background vocals, or chanting, this would also be a good time to set them as such by selecting the syllables and clicking on the pink “F” at the top to mark them as freestyle. This simply means that only the lyrics, but not the notes, are displayed in-game and that they will not be scored when singing. It is also my preferred way of dealing with overlapping vocals or anything else that UltraStar Deluxe does not anticipate. The same goes for rapping notes, though I have only ever seen them in a single song ever, so it is unlikely you will need to use them.
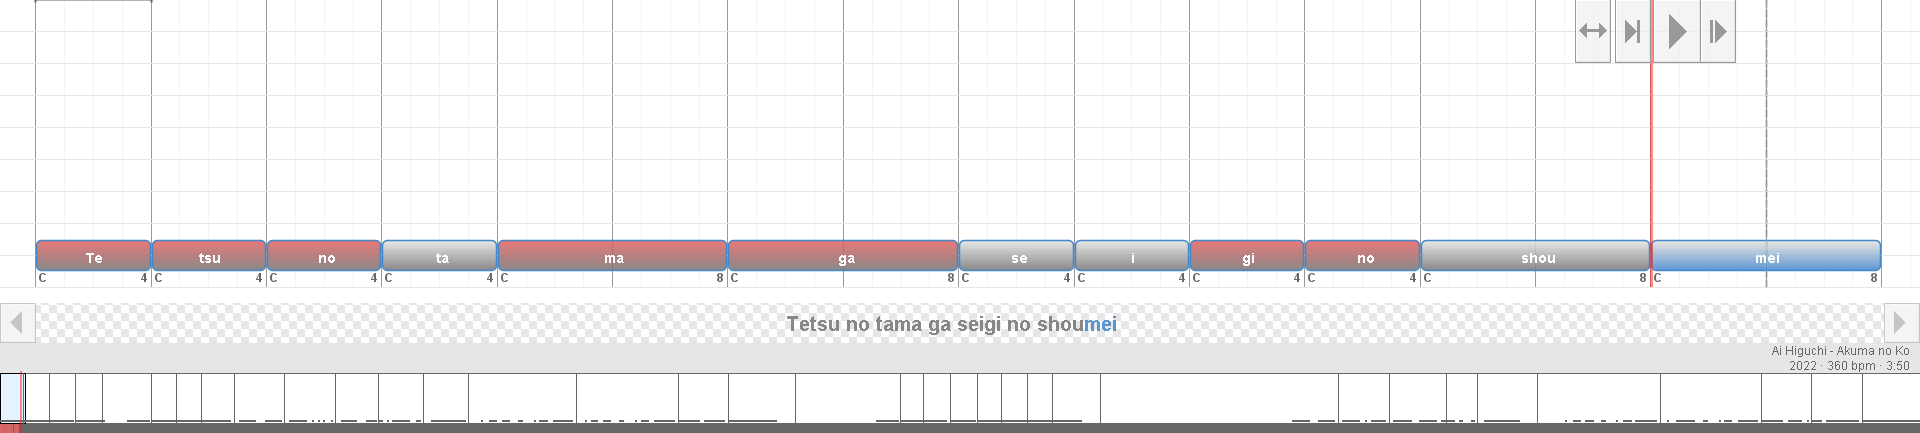
After timing all the lyrics, we move on to the errors. In general, most errors are not game-breaking, but rather show bad style or anything that will make singing the song awkward and annoying. The page errors are the easiest to fix, so we will start there.
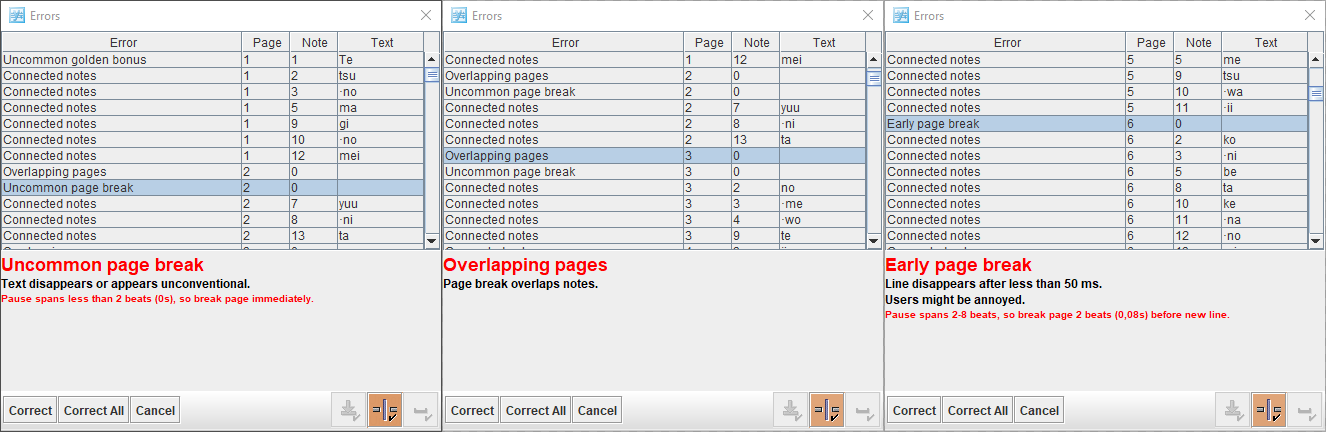
As long as there are no lyrics from different lines overlapping, you can simply click “Correct All” on all the page errors and Yass will automatically set the page breaks automatically to be spaced out accordingly. If you have overlapping lines or want to adjust the page breaks yourself, you can simply drag the page breaks (thin grey dashed line) to the left or right on the editor timeline. You can display two or multiple lines in the timeline at the same time by either selecting multiple lines in the text field or by pressing the “More Pages” button (Magnifying lense) at the top.
“Short page breaks” are a result of the last note of a line being too close to the page break, which is why you sometimes have to resolve the error multiple times. In this case, the last note has to be shortened. In general, it is better to have a good page break than a single note with the correct length. You can also combine the two lines together, but this will only work if they aren’t too long when combined.
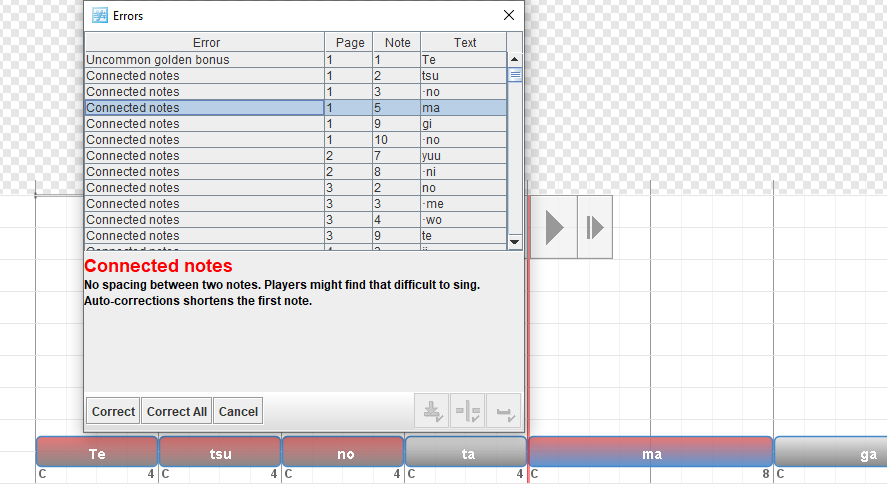
Next, we look at the “Connected notes”. This error occurs, if there is no space between the ending syllable of a word and the first syllable of the next. “Correct” will shorten the ending syllable by one to take into account the small pause you do between words. Again, unless you have overlapping lines or there is another reason why your syllables shouldn’t be shortened, you can simply click on “Correct All” and this will shorten every last syllable of a word by one. Additionally, to allow for some tolerance while singing, you should also include a gap between syllables of the same word if the pitch changes between them. Of course, this can only be done after having pitched all the notes.
The last remaining error should be the “Uncommon golden bonus”. Golden notes give double the points when sung correctly and are visualized in-game by golden particles on the notes. Yass calculates a range for how many notes (by length) should be set as golden. It is up to the creator what notes should be golden, but I recommend long notes at the end of certain lines or certain parts of the lyrics that one wants to highlight. Select a syllable and press on the “Mark as golden”-button (Golden star) at the top to mark the note. A gauge should appear in the bottom left indicating the amount of golden notes. Try to mark notes as golden, until you are somewhere in the yellow area, though again, this is only a recommendation.
Before going into the next step, this is as good a time as any to test your progress and verify if the lyrics are timed correctly. Also take a look at the length of each line and break them up into smaller bits, if they are too long. You can’t really tell in the editor, so the best way to test this would be to play the song with four players. If the length of the notes is hard to gauge, or they only fill slowly, you should probably split the line. The same goes for when the game can’t display the full lyrics of the line at the bottom of the screen, if there is simply too much text.
Step 4: Pitching
Depending on how good or bad your ears are, pitching the song could be the most time-consuming part. You change the pitch by moving the notes up or down. You can either drag them with the mouse, or hold Ctrl and use the up and down arrow keys. Pressing Ctrl + B will toggle the instrument, which will play the current notes on a piano. In combination with toggling the song audio (Ctrl + U), this will allow you to listen to the song solely based on the pitch of the notes.
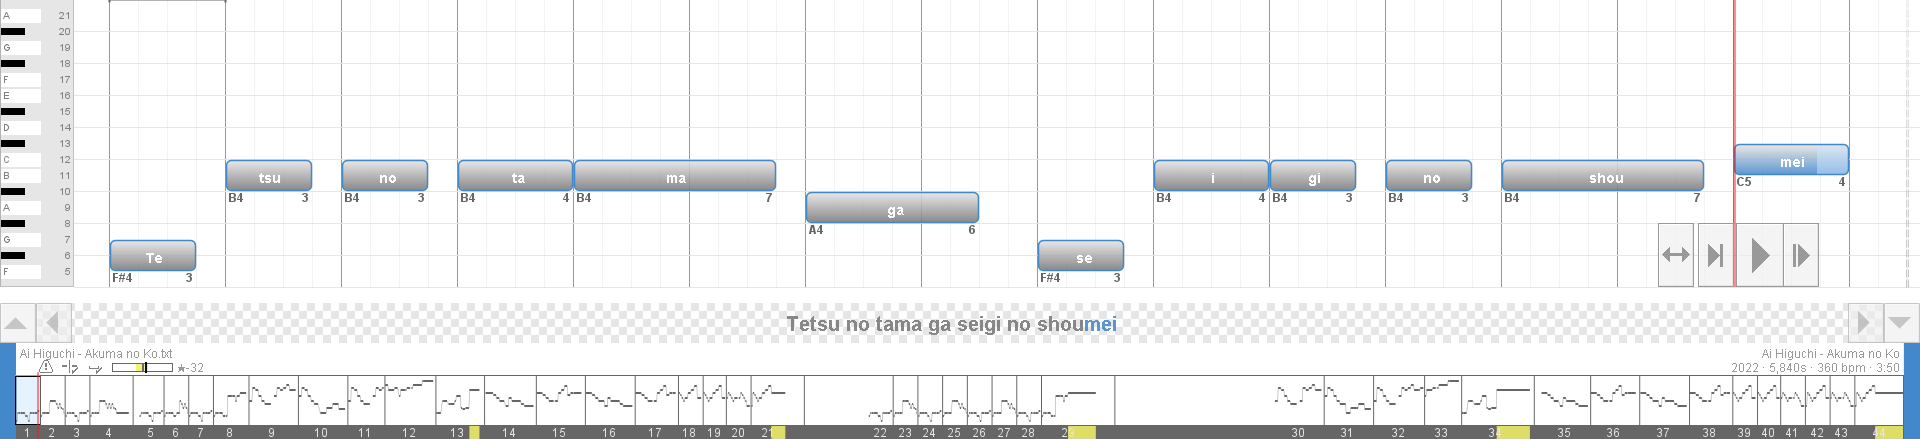
If you are like me and can’t figure out the pitch of a note, even if your life would depend on it, look for additional resources, like sheet music of the song. For me, I often search on YouTube for people who create those piano tutorials in Synthesia or similar programs, which makes copying the notes rather easy. Additionally, you can use the UltraStar Deluxe Editor, as it provides you with a little pitch indicator on how high your current singing is. Alternatively, Singing Carrots provides an online pitch detector, which also displays the current note you are singing.
You can also use a program like ultrastar-pitch, which will try to automatically pitch your timed lyrics, though you will most likely still need to fix most of the notes yourself.
Miscellaneous
Once you have pitched everything, you are essentially done. Sing the song in UltraStar Deluxe a few times to catch any remaining errors. Please consider sharing your song. While you need to be approved on UltraStar España, everyone can upload to USDB after creating an account, but the song will still need to be manually approved. When uploading to USDB, also consider adding Meta Tags, so the USDB Syncer can automatically fetch the audio and video sources. USDB Syncer, as well as Yass Reloaded have an integrated tool that will help you with generating the Tag.
You can find the song for this tutorial on USDB.
Duets
UltraStar Deluxe supports Duets, meaning two different sets of lyrics for multiple players. Fortunately, with the new version of Yass or by using Karedi, conversion to a duet is quite simple. Create a copy of the karaoke file, append [DUET] to the file name and change the #TITLE field to also include [DUET] at the end. The duet file can stay in the same directory as the original file, so it can use the same audio and video files.
To create a duet in Yass, you can follow Yass' duet tutorial, which basically consists of creating a new track and removing all the parts in both tracks that shouldn’t be sung by the respective player. At the end, merge both tracks together and save it.
In Karedi, you simply add a second player, cut and paste the respective lyrics from player one to player two and export the file as a duet.
In UltraStar Deluxe, you can switch the players by pressing the space bar while selecting the duet version.
Originally published on April 9, 2024. Last modified on June 10, 2024.
Related Posts

Comments


Recent Posts
5188 Words | July 4, 2026
2386 Words | June 8, 2026
2082 Words | May 13, 2026
5357 Words | April 5, 2026
2583 Words | February 8, 2026